How to Make Perfect Moka Pot Coffee Every Time
If your coffee comes out bitter, metallic, or sour, you're not alone. Most people learn how to make coffee in a moka pot through trial and error, and the first few batches usually taste rough. The good news is that the fix is rarely the pot itself.
It's almost always the heat, the grind, or the timing.
Per Bialetti's manufacturer specifications, a moka pot brews at roughly 1.5 to 2 bar of pressure. That's far below the 9 bar of a true espresso machine, so the workflow differs from espresso in ways most guides skip. Once you understand how the pressure builds and where the extraction goes wrong, you can pull a rich, balanced cup on the first try.
Quick Answer
To make coffee in a moka pot, fill the bottom boiler with hot water. Stop at the safety valve line. Level medium-fine grounds into the filter basket.
Don't tamp. Screw the top on hand-tight. Heat on medium-low and open the lid.
Watch the dark coffee rise slowly. Pull the pot at the first gurgle. Rest it for 30 seconds before pouring.
Why Your Moka Pot Coffee Tastes Bitter or Burnt (It's Not the Pot)
The Real Culprit: Heat, Grind, or Over-Extraction
A moka pot doesn't randomly ruin coffee. It ruins coffee through three pathways, and each has a different fix.
Heat is the biggest offender. Most people crank the burner to high because they want coffee fast. That scorches the aluminum base and boils the water violently.
The steam then blasts through the grounds, turning the brew harsh and ashy.
Use medium-low heat instead. On an electric stove, aim for 5 out of 9. On gas, keep the flame small enough that it doesn't lick the sides of the pot.
Grind size is the second variable. Grounds that are too fine, like espresso powder, clog the metal filter. The water fights its way through, and you get sputtering, bitter coffee.
Grounds that are too coarse let the water rush through. That under-extracts, leaving a sour, thin cup.
Aim for the texture of table salt. A burr grinder makes this repeatable. Blade grinders create uneven particles that cause chaotic extraction.
Over-extraction is the third culprit. The final ounces of water push out the most bitter compounds. That's why the gurgle at the end is a warning, not a signal to leave it longer.
When the sound changes, the boiler is nearly empty. Pull the pot off the heat immediately.
How a Moka Pot Works: Pressure, Crema, and the Extraction Zone
The 1-3 Bar Reality vs. Espresso's 9 Bars
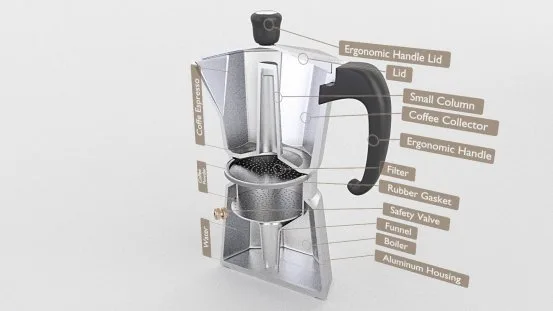
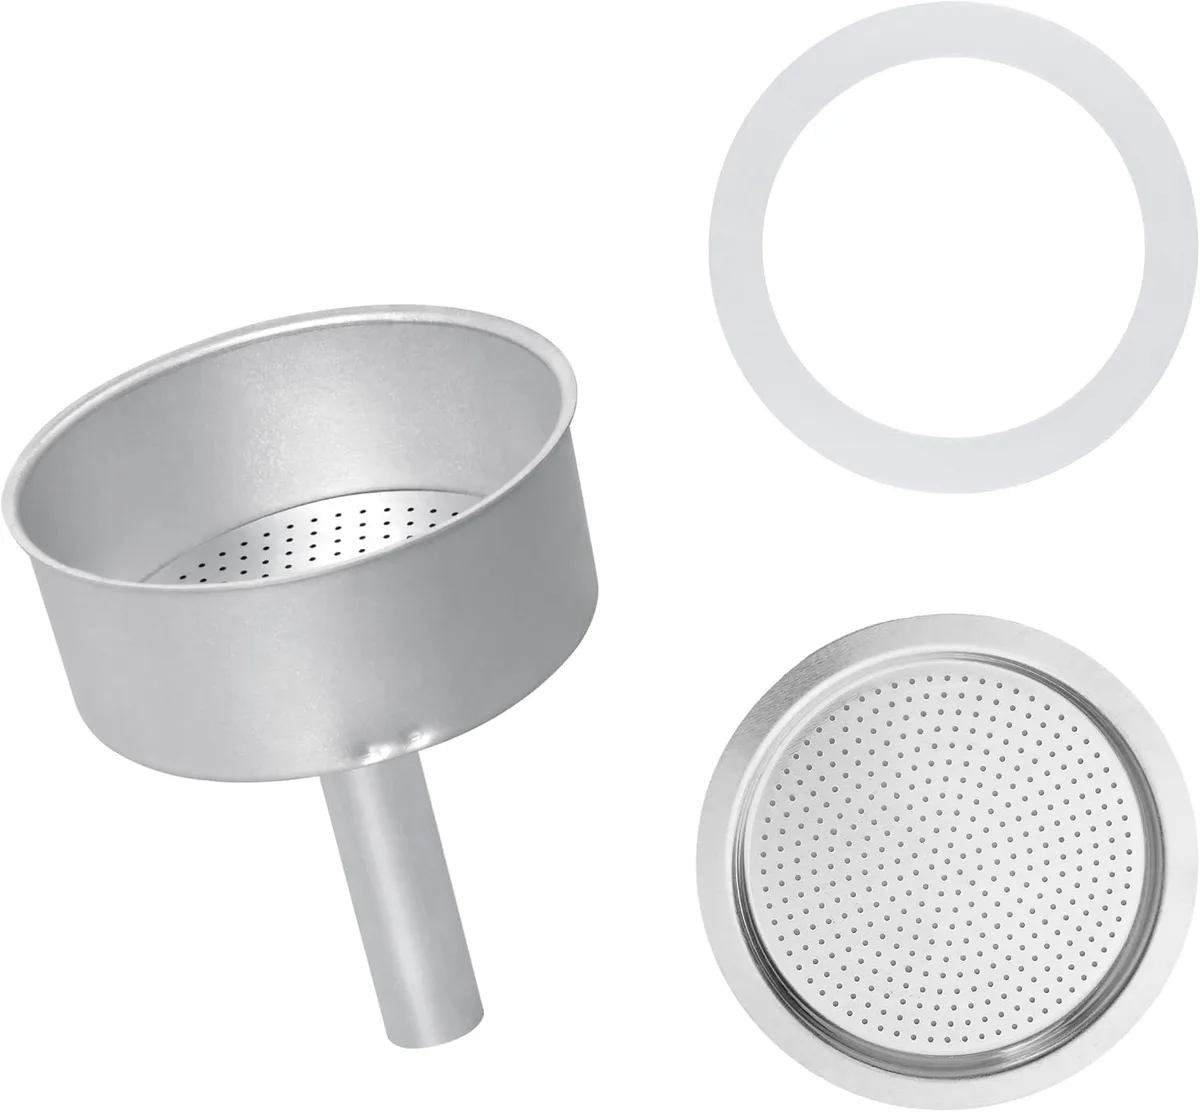
A moka pot has three key parts. The bottom boiler chamber holds the water. The funnel-shaped filter basket holds the coffee.
The top chamber collects the brew. As the water boils, pressure builds in the sealed bottom chamber. The steam pushes hot water upward through the grounds and into the top chamber.
A moka pot does not make true espresso. It brews at 1.5 to 2 bar, while espresso machines push 9 bar. The foam you get on top is a fake crema, an emulsion of coffee oils and air.
It looks nice but fades fast. It also lacks the velvet texture and sweetness of real espresso crema.
The extraction zone is the sweet spot near the end of the brew. That's where the water runs through the grounds at 195 to 205°F (90 to 96°C). That temperature window matches the brew guidance from the Specialty Coffee Association.
It also aligns with extraction research at the UC Davis Coffee Center. Keep the brew inside that range, and you'll pull a balanced, smooth cup.
The Moka Pot Decision Workflow: Match These Variables First
Before you touch the coffee, assess your setup. The brew depends on three physical variables, and each changes your workflow.
Stove Type: Gas, Electric, or Induction?
- Gas: Best control. Keep the flame within the base diameter so the handle doesn't melt and the sides don't overheat.
- Electric coil: Slower response. Start at medium and give the pot extra time to come up. Pull it early because the burner stays hot.
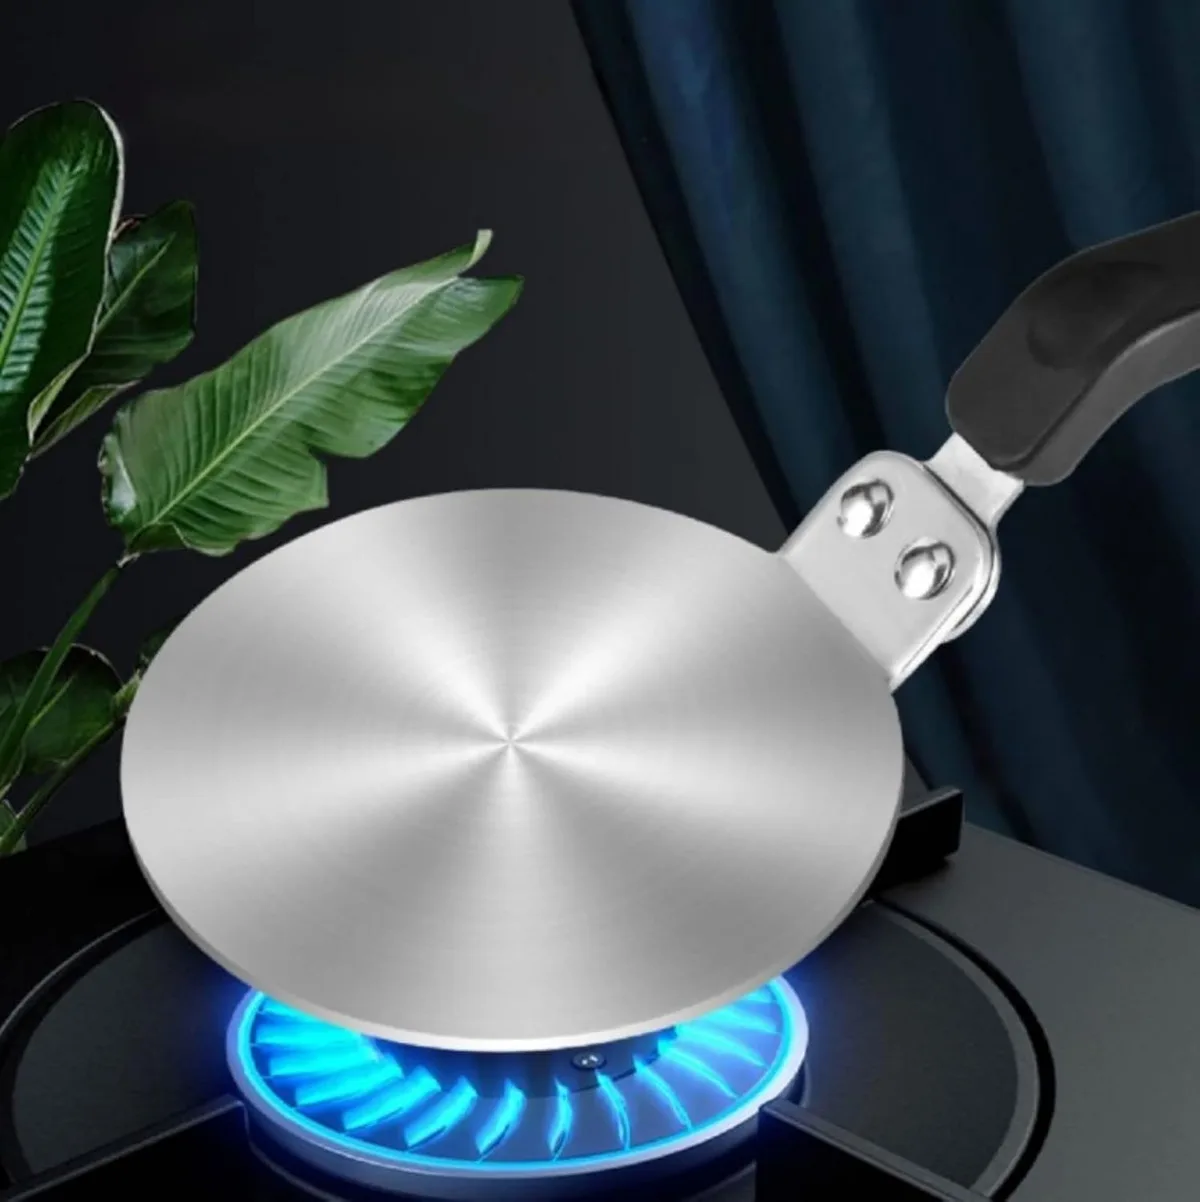
- Induction: A standard aluminum moka pot won't work on induction without a steel diffuser plate. Or buy a stainless steel model with an induction-compatible base.
Pot Size and Water Drain: 1-Cup vs. 6-Cup
Moka pot sizes refer to espresso-sized cups of 1.5 to 2 ounces each. A 3-cup pot yields roughly 4.5 to 6 ounces of strong coffee. That's perfect for one mug.
A 6-cup pot gives you 9 to 12 ounces, enough for two.
Here's the catch most guides miss. You can't brew a small batch in a big pot. The filter basket is fixed, and the ratio changes with each size.
If you use one cup's worth of grounds but fill the boiler to the valve line, the water rushes through too fast. You get weak, espresso-tinged water. Match the pot to your daily dose.
Roast Level and Grind Size Decisions
Dark roast expands more, so use a slightly coarser setting. Medium roast is the versatile default. Table-salt texture works perfectly.
Light roast is tricky because it needs more heat to extract, which often yields sharp, sour coffee. If you use light roast, grind slightly finer and keep the heat gentle.
Step-by-Step Moka Pot Brewing: A Clean, Repeatable Process
The Four-Stage Brewing Workflow (Heat, Flow, Gurgle, Rest)
Once your stove and pot match, the rest is a repeatable sequence. Follow these six steps, and you'll get the same good cup every morning.
- Boil water separately. Fill the bottom chamber with near-boiling water, not cold. Stop at the safety valve line inside the boiler. Don't fill above it.
- Fill the funnel basket. Spoon in the grounds and level them with a knife or finger. Don't tamp or press. The bed needs air space so water can move through naturally.
- Assemble and set the heat. Screw the top on hand-tight. You want a good seal without crushing the gasket. Place the pot on medium-low heat with the lid open.
- Watch for the first dark drops. Coffee should appear slowly a few seconds after steam escapes the spout. If the flow is violent, turn the heat down.
- Shut off at the gurgle. Around 70 to 80 percent of the brew will sit in the top chamber when the sound changes. Remove the pot from the heat. Residual steam pressure finishes the last ounces.
- Rest and stir. Wait 20 to 30 seconds, then stir the coffee once in the top chamber. First and last pours have different strengths. Stirring evens them out.
Common Moka Pot Mistakes (and How to Fix Each One)
Gasket Checks, Thermal Shock, and the Bloom Trap
Most bad moka pot complaints trace back to the same handful of errors. Fix these, and your coffee transforms.
- Filling the boiler past the valve. This weakens the brew because the steam has less room to pressurize. It's also a safety hazard. Always stop below the valve.
- Tamping the grounds. This blocks the filter and can create a geyser of steam and coffee. Level, don't pack.
- Running the heat too high. This produces bitter, burnt flavors and can warp the base. If your coffee tastes ashy, turn the heat down and extend the brew time.
- Leaving old coffee in the pot. Stale residue oxidizes and ruins the next batch. Rinse the parts right after each use.
- Thermal shock. Never run cold water over a hot aluminum pot. Rapid cooling warps the metal and cracks the gasket seal. Let the pot cool first.
The rubber gasket in the top lid does heavy lifting. If it feels hard, cracked, or won't seal snugly, replace it. Gaskets cost a few dollars and last about a year with daily brewing.
Fresh coffee also has a "bloom" problem. Freshly roasted beans release CO2. In a pour-over, that gas escapes harmlessly.
In a sealed moka pot, it can push water through the bed unevenly. If your beans are less than a week off roast, grind them and let them sit for a few minutes before brewing.
Uneven grounds cause uneven extraction. No heat control can fix that. The fastest upgrade is a proper burr grinder.
You can see how we handle product transparency in our affiliate disclosure.
Moka Pot vs. Other Brewing Methods: Choosing the Right Tool
If you're weighing options, the moka pot sits in a specific sweet spot. It's stronger than drip coffee, easier than a manual espresso machine, and faster than a French press. But it isn't the best fit for every situation.
| Method | Pressure | Brew Time | Strength | Best For |
|---|---|---|---|---|
| Moka Pot | 1.5 to 2 bar | 4–6 min | Strong, bold | Budget-friendly rich coffee |
| French Press | None (steep) | 4 min | Full-bodied | Clean, smooth cups |
| AeroPress | Light manual | 2 min | Versatile | Single cups, travel |
| Espresso Machine | 9 bar | 30–45 sec | Concentrated | True espresso, milk drinks |
When to Pick a Moka Pot Over a French Press, AeroPress, or Espresso Machine
Choose a moka pot when you want espresso-like strength without the cost of a machine. It's also great for camping, small kitchens, or anyone who enjoys the hands-on ritual of stovetop brewing.
Pick a French press when you want a cleaner, more forgiving cup. There's no pressure to manage, just a timer and a plunge. Pick an AeroPress for the fastest cleanup and single-cup speed.
For true espresso with thick crema, you need a pump-driven machine at 9 bar. That's the same control you find behind a bar with a serious drinks program.
If you're wondering how a strong stovetop brew fits a full meal, start by scanning nearby menus for pairing ideas. Beyond the kitchen, plenty of restaurants build their whole experience around coffee and food together. Browsing a few menu collections shows how much thought goes into the pairings.
Moka Pot FAQs: Quick Answers to What's Still Confusing
Is moka pot coffee the same as espresso?
No. Espresso requires 9 bar of pressure, and a moka pot reaches only 1.5 to 2 bar. The flavor is intense, but the body is lighter and the crema is mostly foamed oil.
Think of it as strong stovetop coffee. For genuine espresso, you need a pump-driven machine.
Why does my moka pot coffee taste watery?
You're probably filling the boiler past the safety valve. Extra water dilutes the coffee and lowers extraction pressure. Check the grind too.
Coarse grounds let water rush through too fast. Use table-salt texture, stop at the valve line, and remove the pot at the first gurgle.
Can I use paper filters in a moka pot?
Yes, some people add a small paper filter on top of the grounds to remove fine sediment. It produces a cleaner cup with less sludge. But the standard metal filter already does a solid job.
If you try paper, cut one circle per brew and use a single layer.
How do I clean a moka pot without soap?
Rinse every part in hot water right after use. Use a soft sponge, never steel wool. Soap strips the aluminum's seasoning and can make coffee taste metallic.
Dry everything fully before reassembling. For stubborn residue, run a batch of plain water through the pot.
Can I use a moka pot on an induction stove?
Only if the pot is stainless steel with a magnetic base. Aluminum models need a steel diffuser plate to work on induction. As of 2026, most major brands, including Bialetti, offer induction-ready stainless steel versions.
Check the base with a magnet before buying.
How long does a moka pot last?
With proper care, decades. Replace the rubber gasket every year or so and inspect the safety valve now and then. Many Italian families still use pots passed down since the 1950s.
That kind of durability is rare in modern kitchen gear.
For anyone exploring coffee at home, the moka pot is the best value around. Once you dial in the heat, grind, and timing, it delivers a cup that rivals a cafe for a fraction of the cost. Pair it with a proper breakfast, and you'll understand why local breakfast menus are worth a look.
Trust the process, listen for the gurgle, and enjoy the ritual.

Similar Posts